
The 279 Quilt - Pillow Tutorial
How to Make a Bonus Pillow with the Offcuts from the Baby size 279 Quilt
More and more recently, I’ve been thinking about what to do with the ever growing mountain of scraps in my sewing room. I am running out of space for these scraps. Instead of them being neatly tucked away (to think about later), I have piles out in the open, like stalagmites growing all around my sewing space. They are a constant reminder that I really need to do something about my scrap management!
Last year when I designed a quilt for Love Patchwork and Quilting magazine (this quilt, The 5720 Quilt), the magazine had asked me to create a mini design to accompany the larger piece. The Mini I designed used the offcuts from the larger Throw, and I really liked the idea of whipping up a secondary piece while you’re still making the first, using only the pieces you already had out on your table.
As I finished my Baby sized version of The 279 Quilt, I was left with those bits and pieces that we quilters always have at the end of the project. And I knew I wanted to use these to help create a bonus project. So here you’ll find instructions on how to turn your leftover pieces into a 16” pillow cover that is the perfect accompaniment to your 279 Quilt. This tutorial uses pieces left from block construction, as well as leftover fabric from initially cutting out the fabric pieces. I build a little wiggle room into my fabric requirements, so unless there was any sort of cutting mistake (hey, it happens!) you should have a bit left over ;)
Will this make a giant dent in my scrap pile? Not really, but every little bit counts, so I’ll tackle one piece at a time.
Let’s get into it!

The completed 279 Quilt Pillow
What you’ll need:
The 279 Quilt pattern, and you will have to have completed the Baby sized top- save the leftovers from the construction of your top!
Fork pins (new to fork pins? Check out this tutorial all about how to use them!) and/or normal pins
Sewing machine (mine’s a Janome Skyline S5)
Thread (using Aurifil 50wt in white here)
Iron
Rotary Cutter
Ruler
16” Square Pillow insert
Piece of batting 20.5” square (which will give you 2” extra on all sides) *Tip: this is a great place to use up some batting scraps!
Piece of fabric 20.5” square (which will give you 2” extra on all sides ). *Note: this will not be seen, as it’s inside the pillow. This can be whatever fabric you have but be careful if your pillow top is light in color, and then make sure you use a light fabric so it won’t be visible.
(2) pieces of fabric 10.5” x 16.5” (backing) *Tip: I used scraps from my backing fabric to create these two panels

Let’s use these leftover pieces!
This pattern assumes:
HSTs = half square triangles, RST = right sides together, WST = wrong sides together
Press seams open
¼” seam allowance
Cutting the Pieces
When you cut out your A and B blocks from the tubes you constructed, you will have some extra ‘tube’ left- there will be enough to cut 4 additional blocks, which will give you (2) A Blocks and (2) B Blocks.
While creating your Block C’s, you cut off the outer triangles to create the partial square in a square block. Use these offcuts to create half square triangles. Sew these pieces RST along the long edge and press, then trim to 2” square. Make (12) HSTs.
You’ll need (2) pieces of the Fabric 1 (in this case, the Pale Pink fabric) that are 3.5” x at least 1”. As you can probably guess, the ‘at least 1”’ measurement isn’t specific- use what you have.
And finally, for the sashing, you’ll need (2) pieces of Fabric 1 measuring 3.5” x 13.5” and (2) pieces of Fabric 1 measuring 2” x 16.5”. You should be able to get this from what’s leftover from the initial cutting stage. If you don’t have enough, that’s okay! Take a look at your stash and see what might work!

Little HSTs ready to go
Assembly
Take (1) Block A and (1) Block B and sew, RST, like the set on the left. Take your remaining Block A and B and sew, RST, like the set on the right.
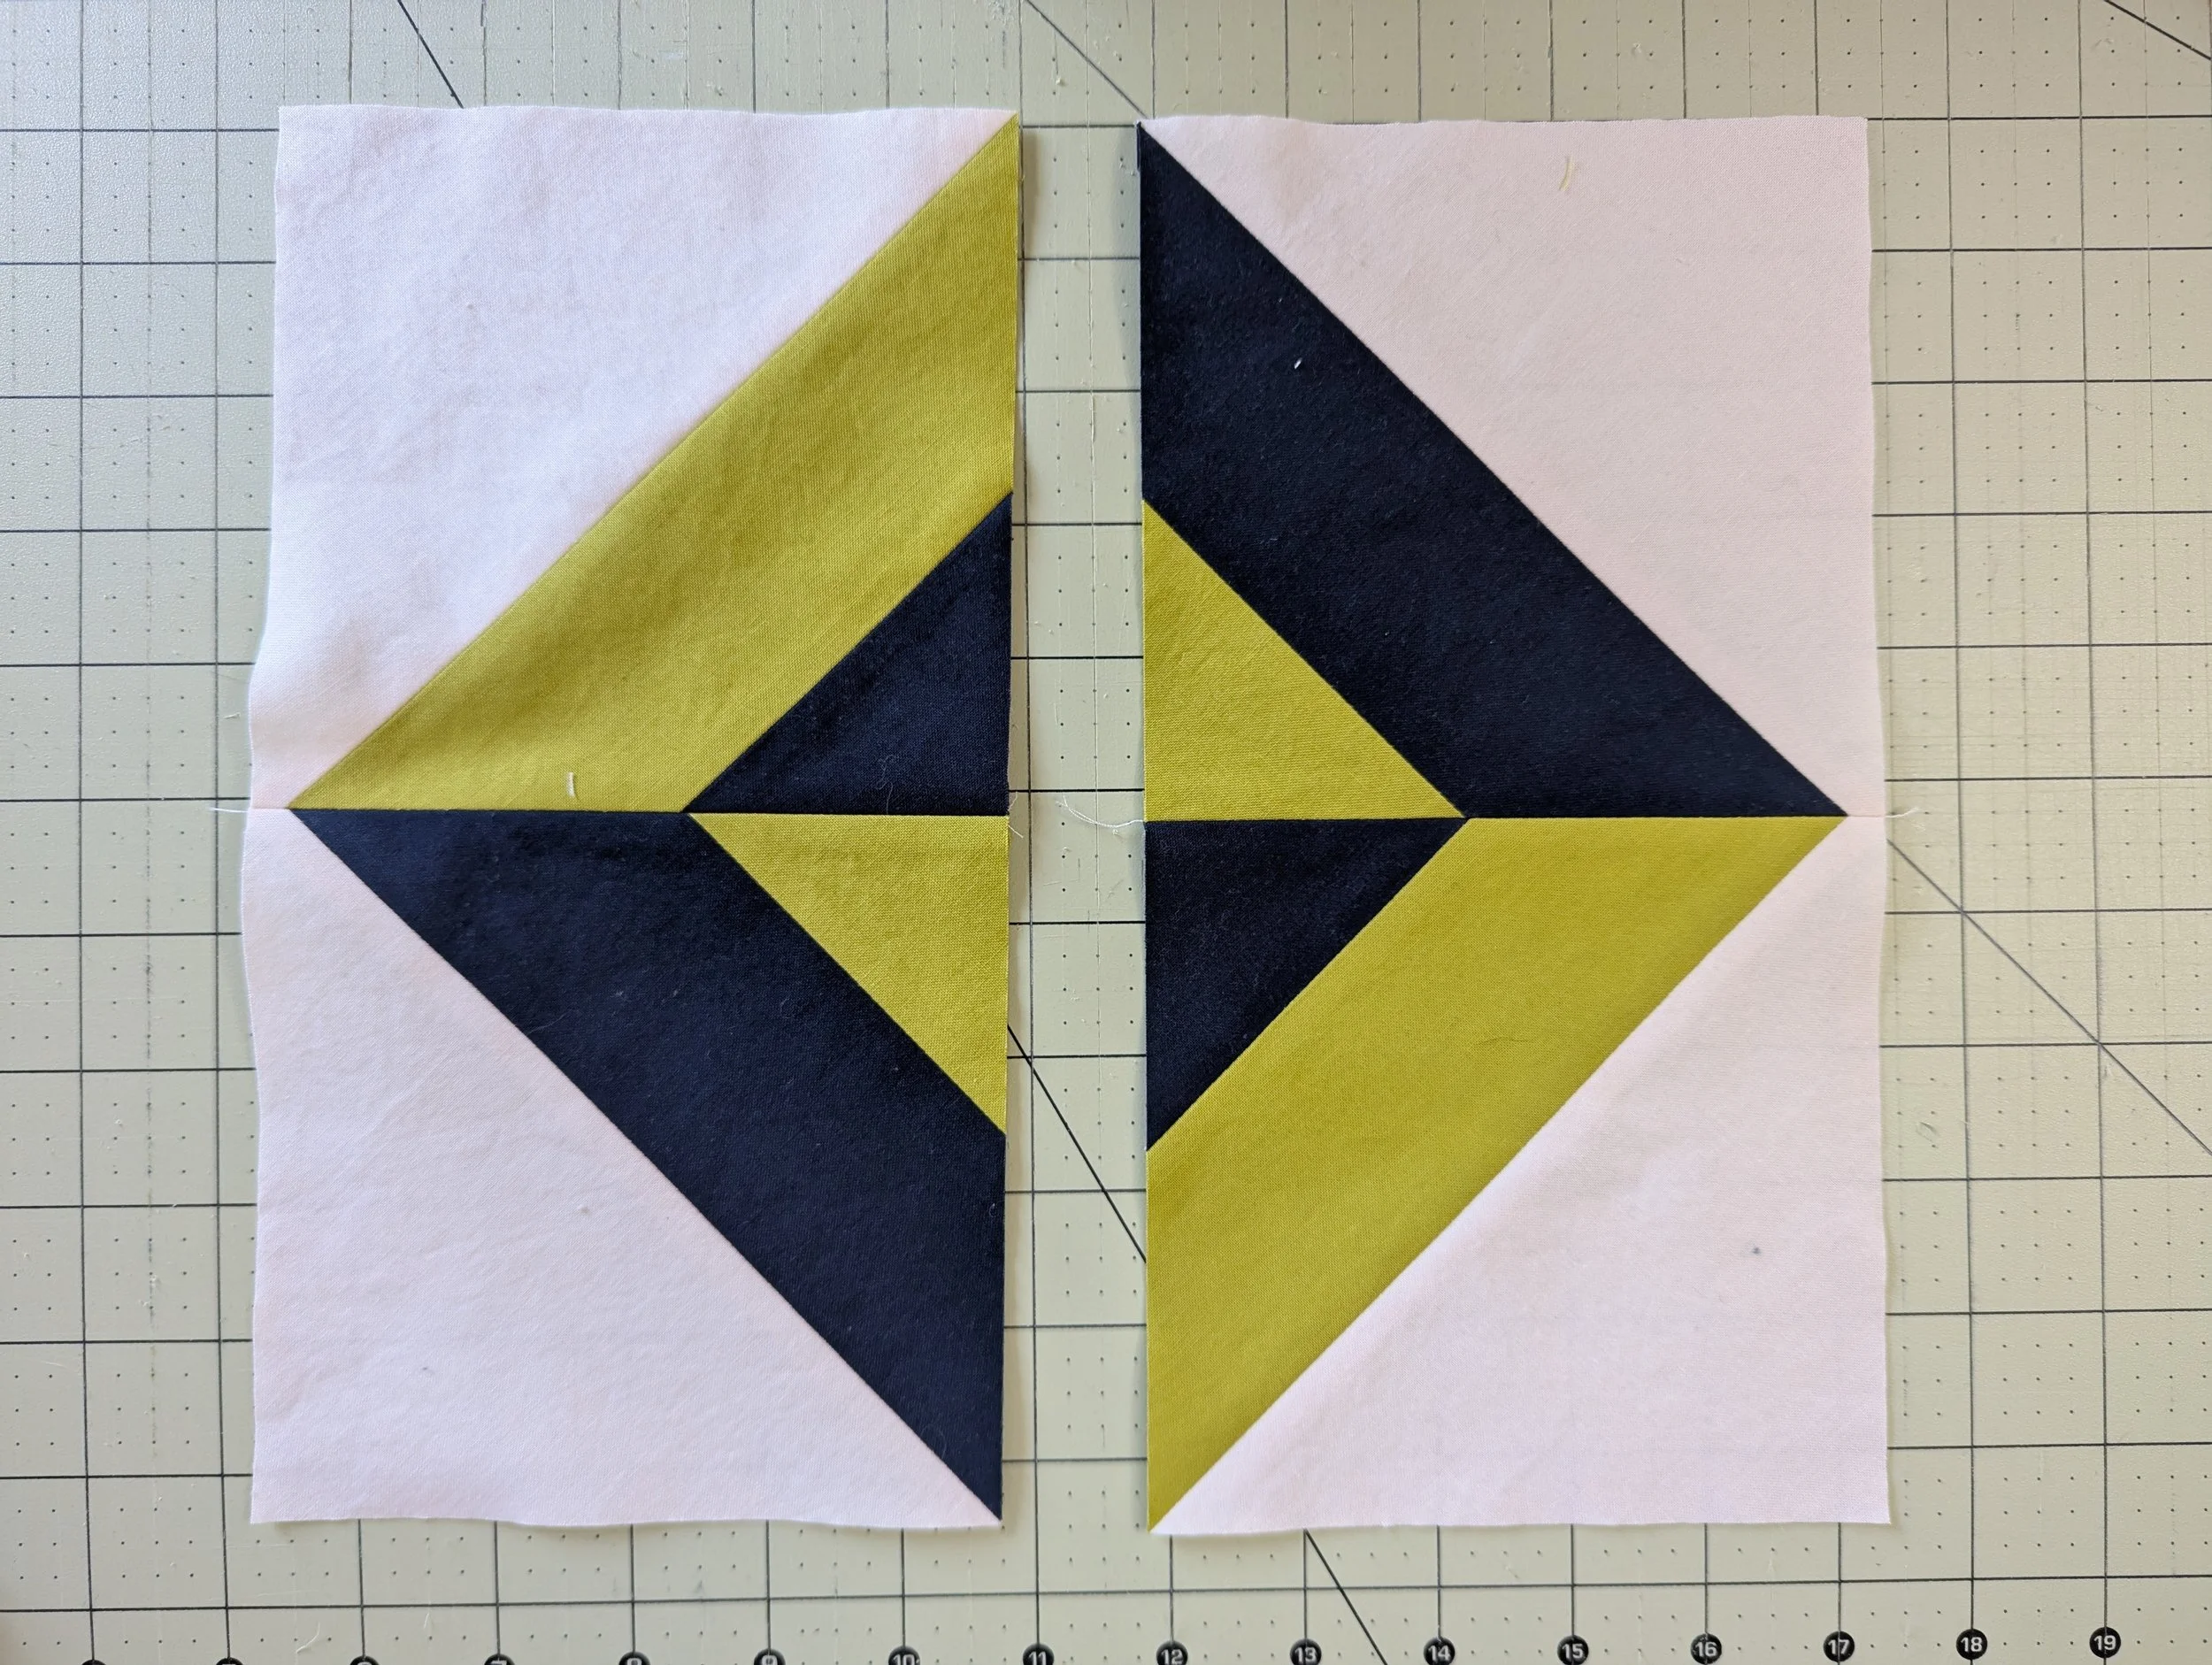
Assemble your A and B Blocks as seen here.
Now take your (12) HSTs and sew RST to create a row of three diamond shapes.
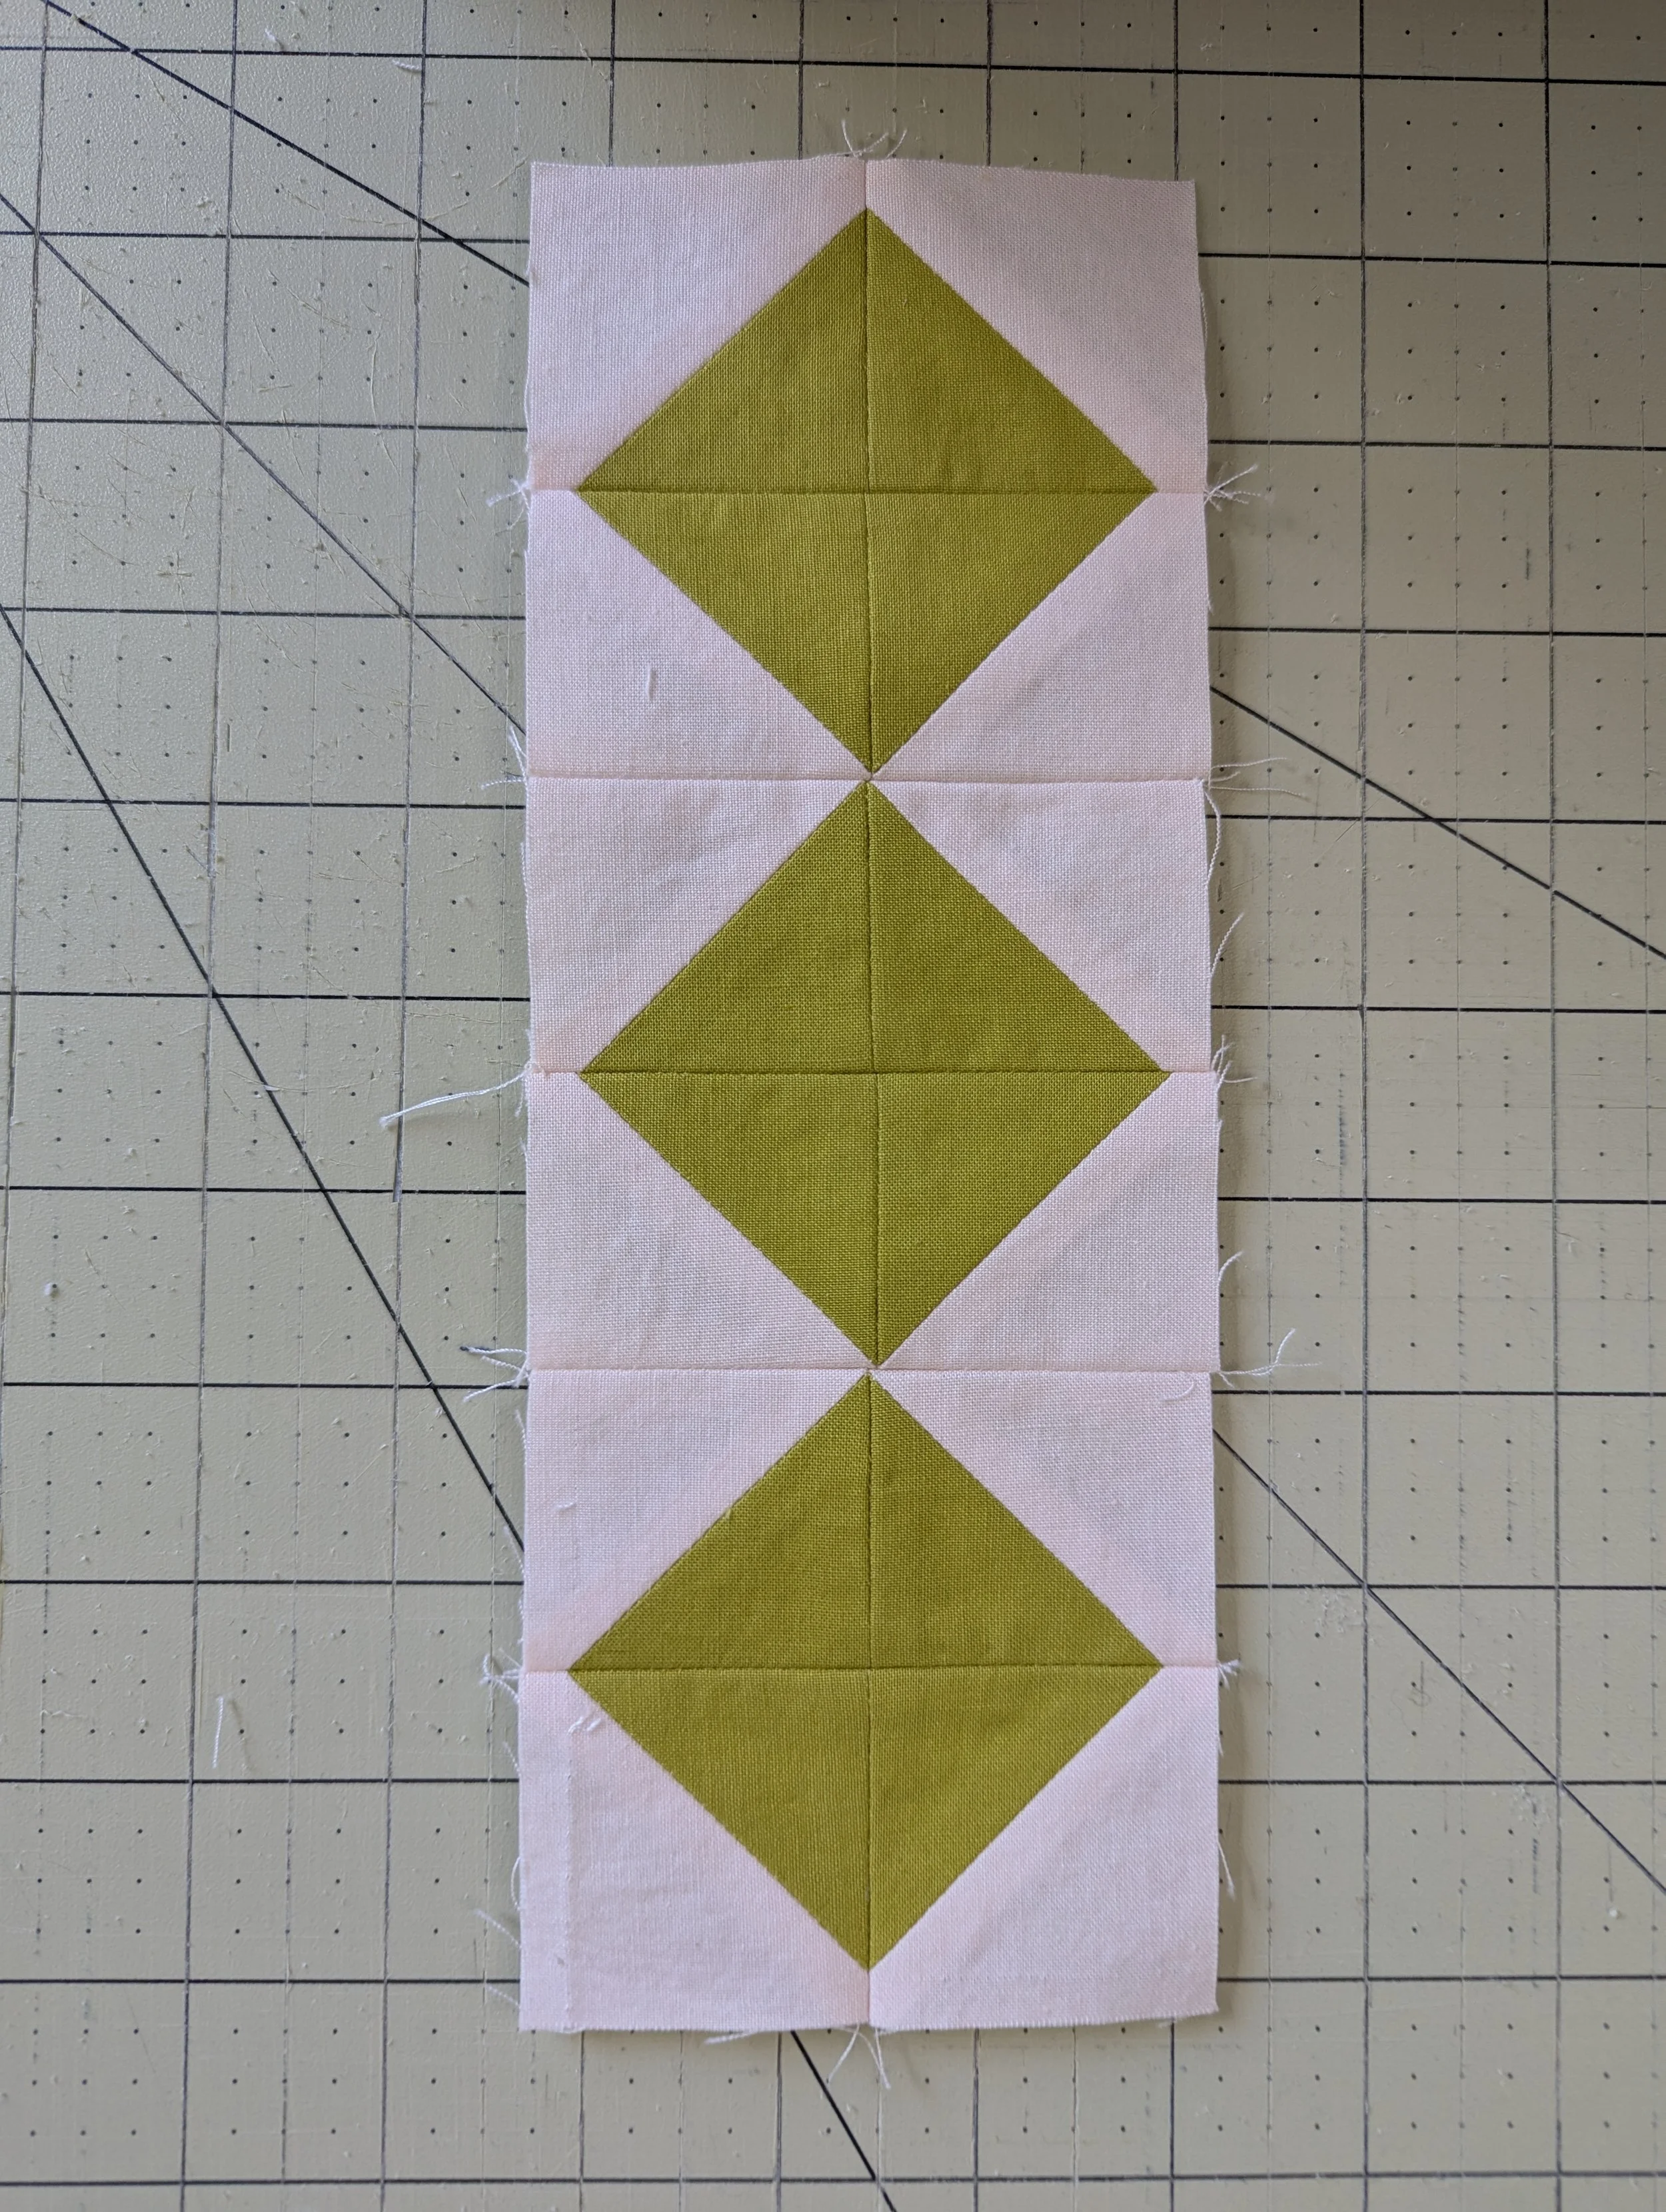
Take your HSTs and create three diamonds stacked on one another
Then, take your (2) 3.5” x at least 1” pieces and sew, RST, to each end of the diamond strip. Press.
Lay the diamond strip in the middle of your Block A/B sets and line up the middle seam.
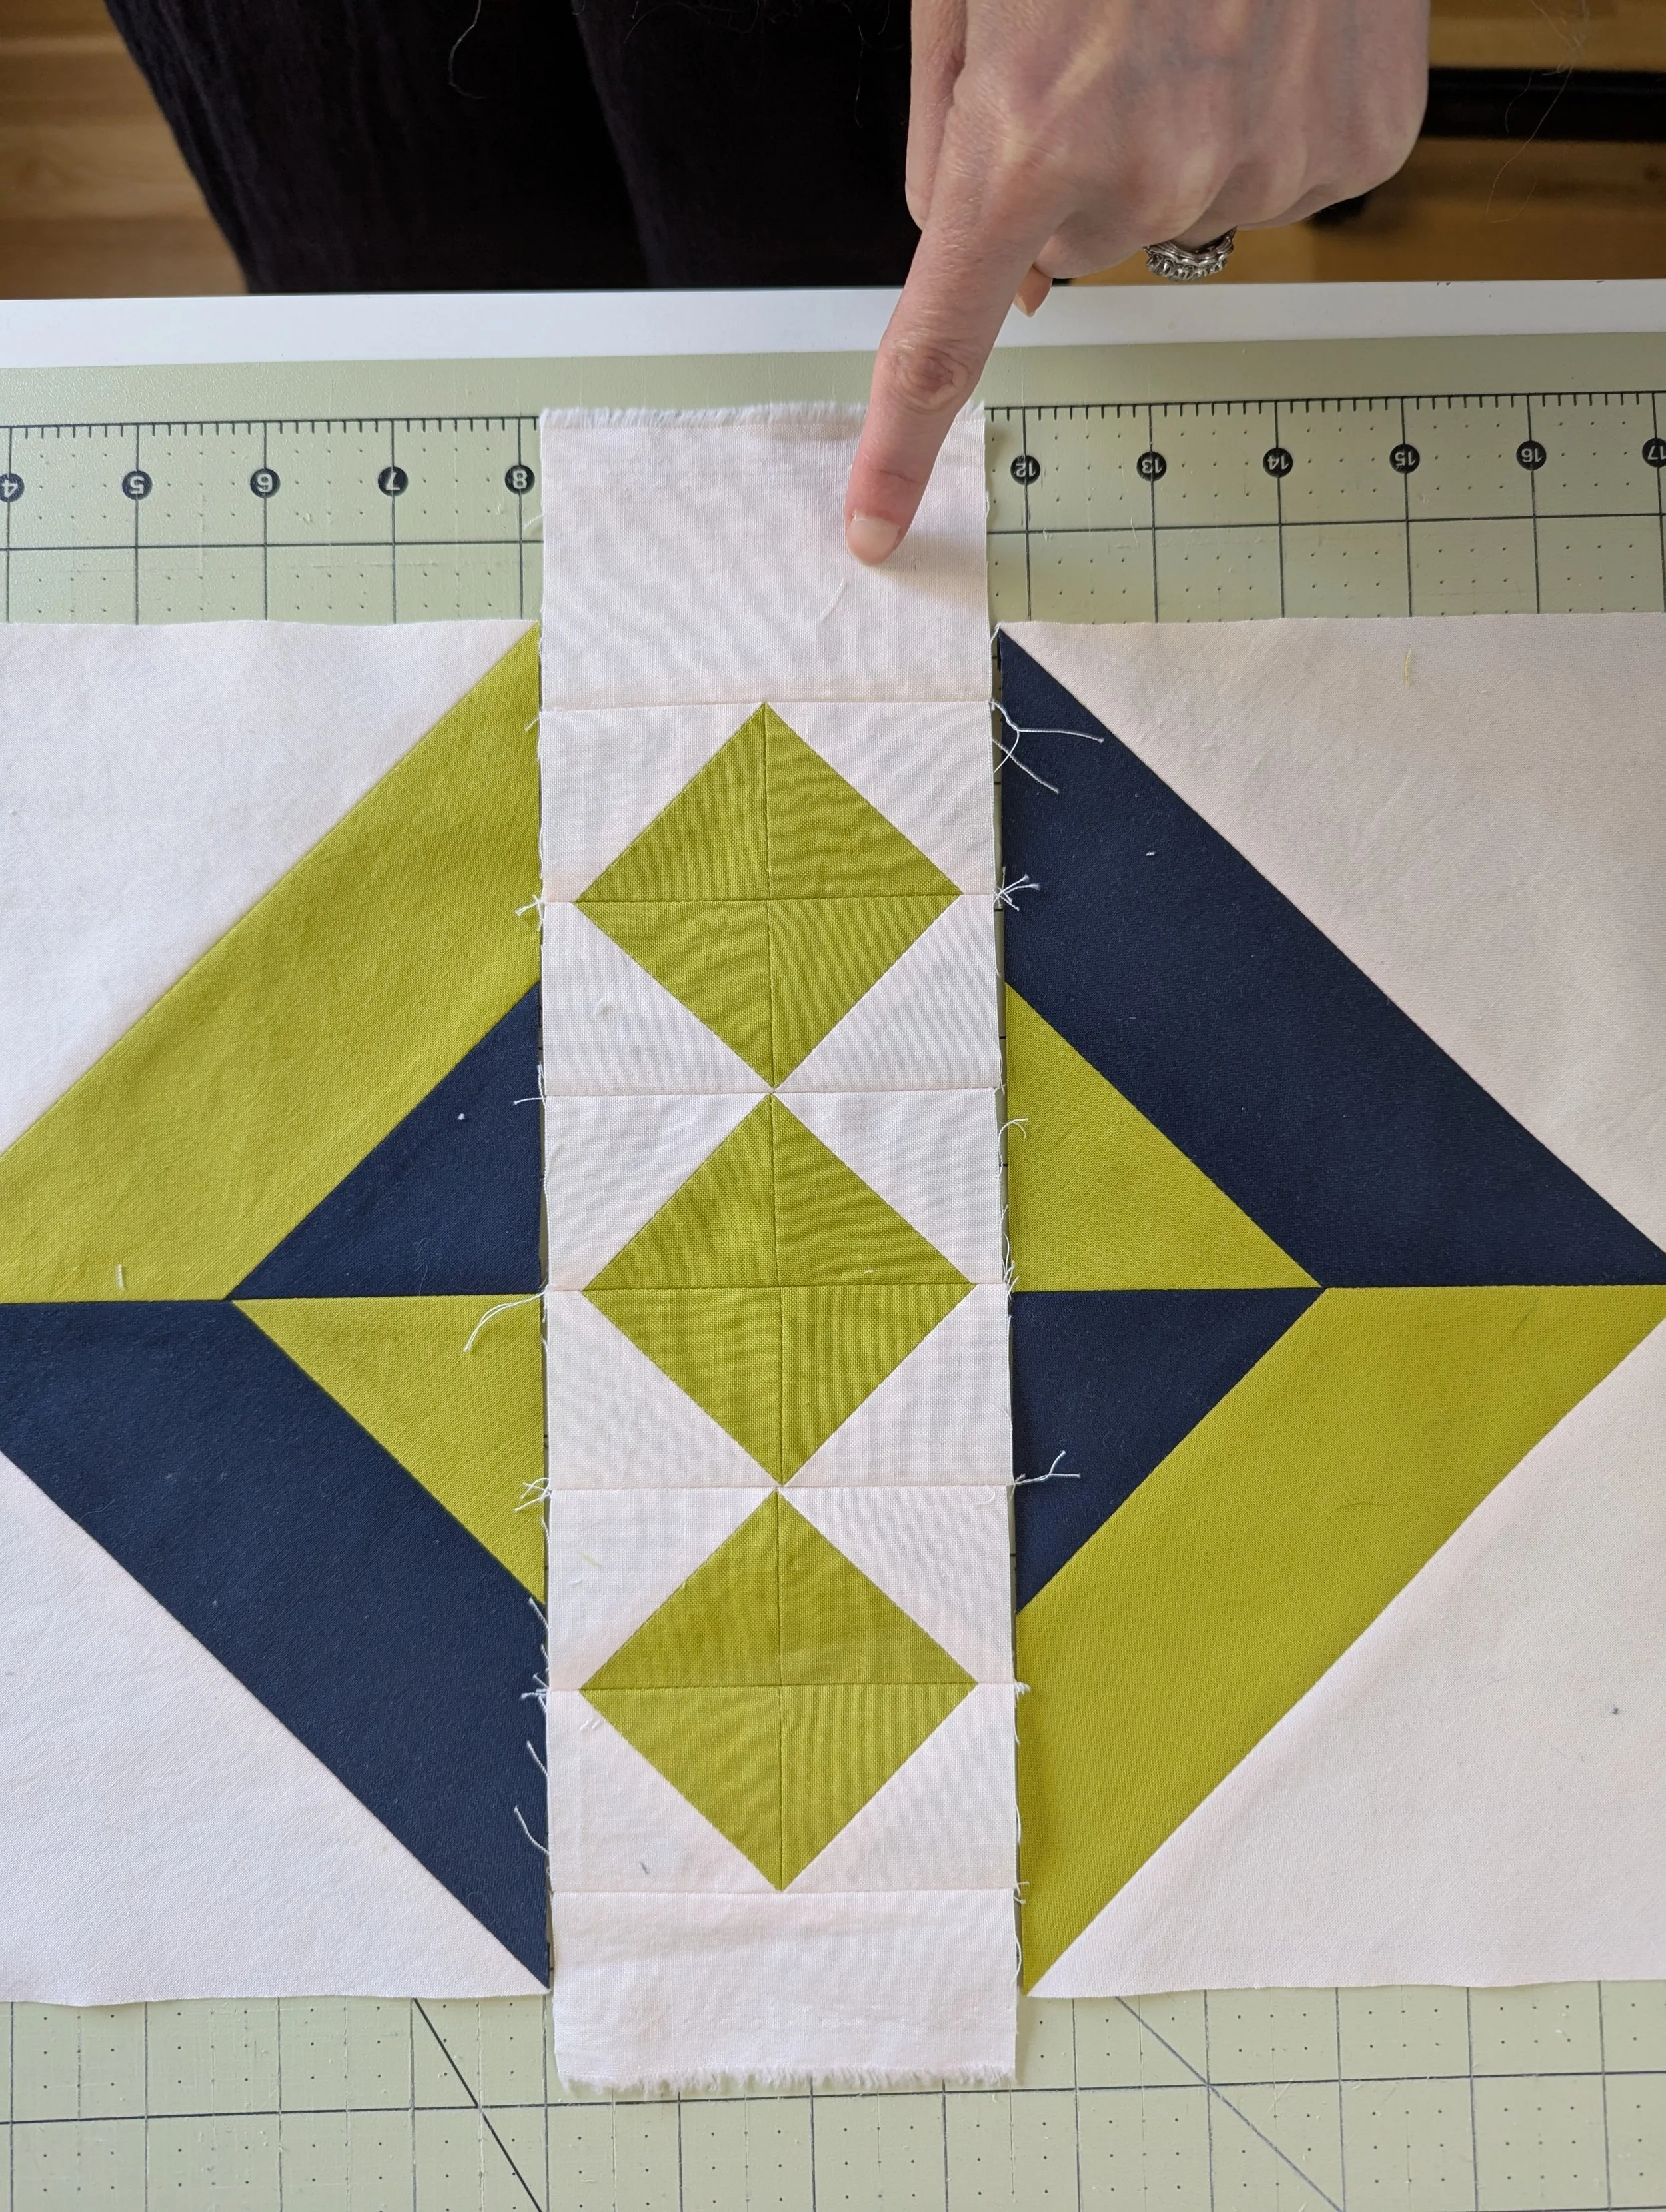
Line up the middle seams of the diamonds and the Block A/B pieces. You see the extra bit hanging out from the diamond strip- don’t worry about that, we’ll trim it later!
Pin the diamond strip piece to one of the Block A/B pieces, RST. Sew, press, and repeat on the other side so you have the diamond strip in the middle. *Note: I use fork pins to help with my seam matching accuracy, so you’ll see the middle seam is secured that way, and I use normal pins elsewhere. For help on using fork pins, check out my tutorial here.
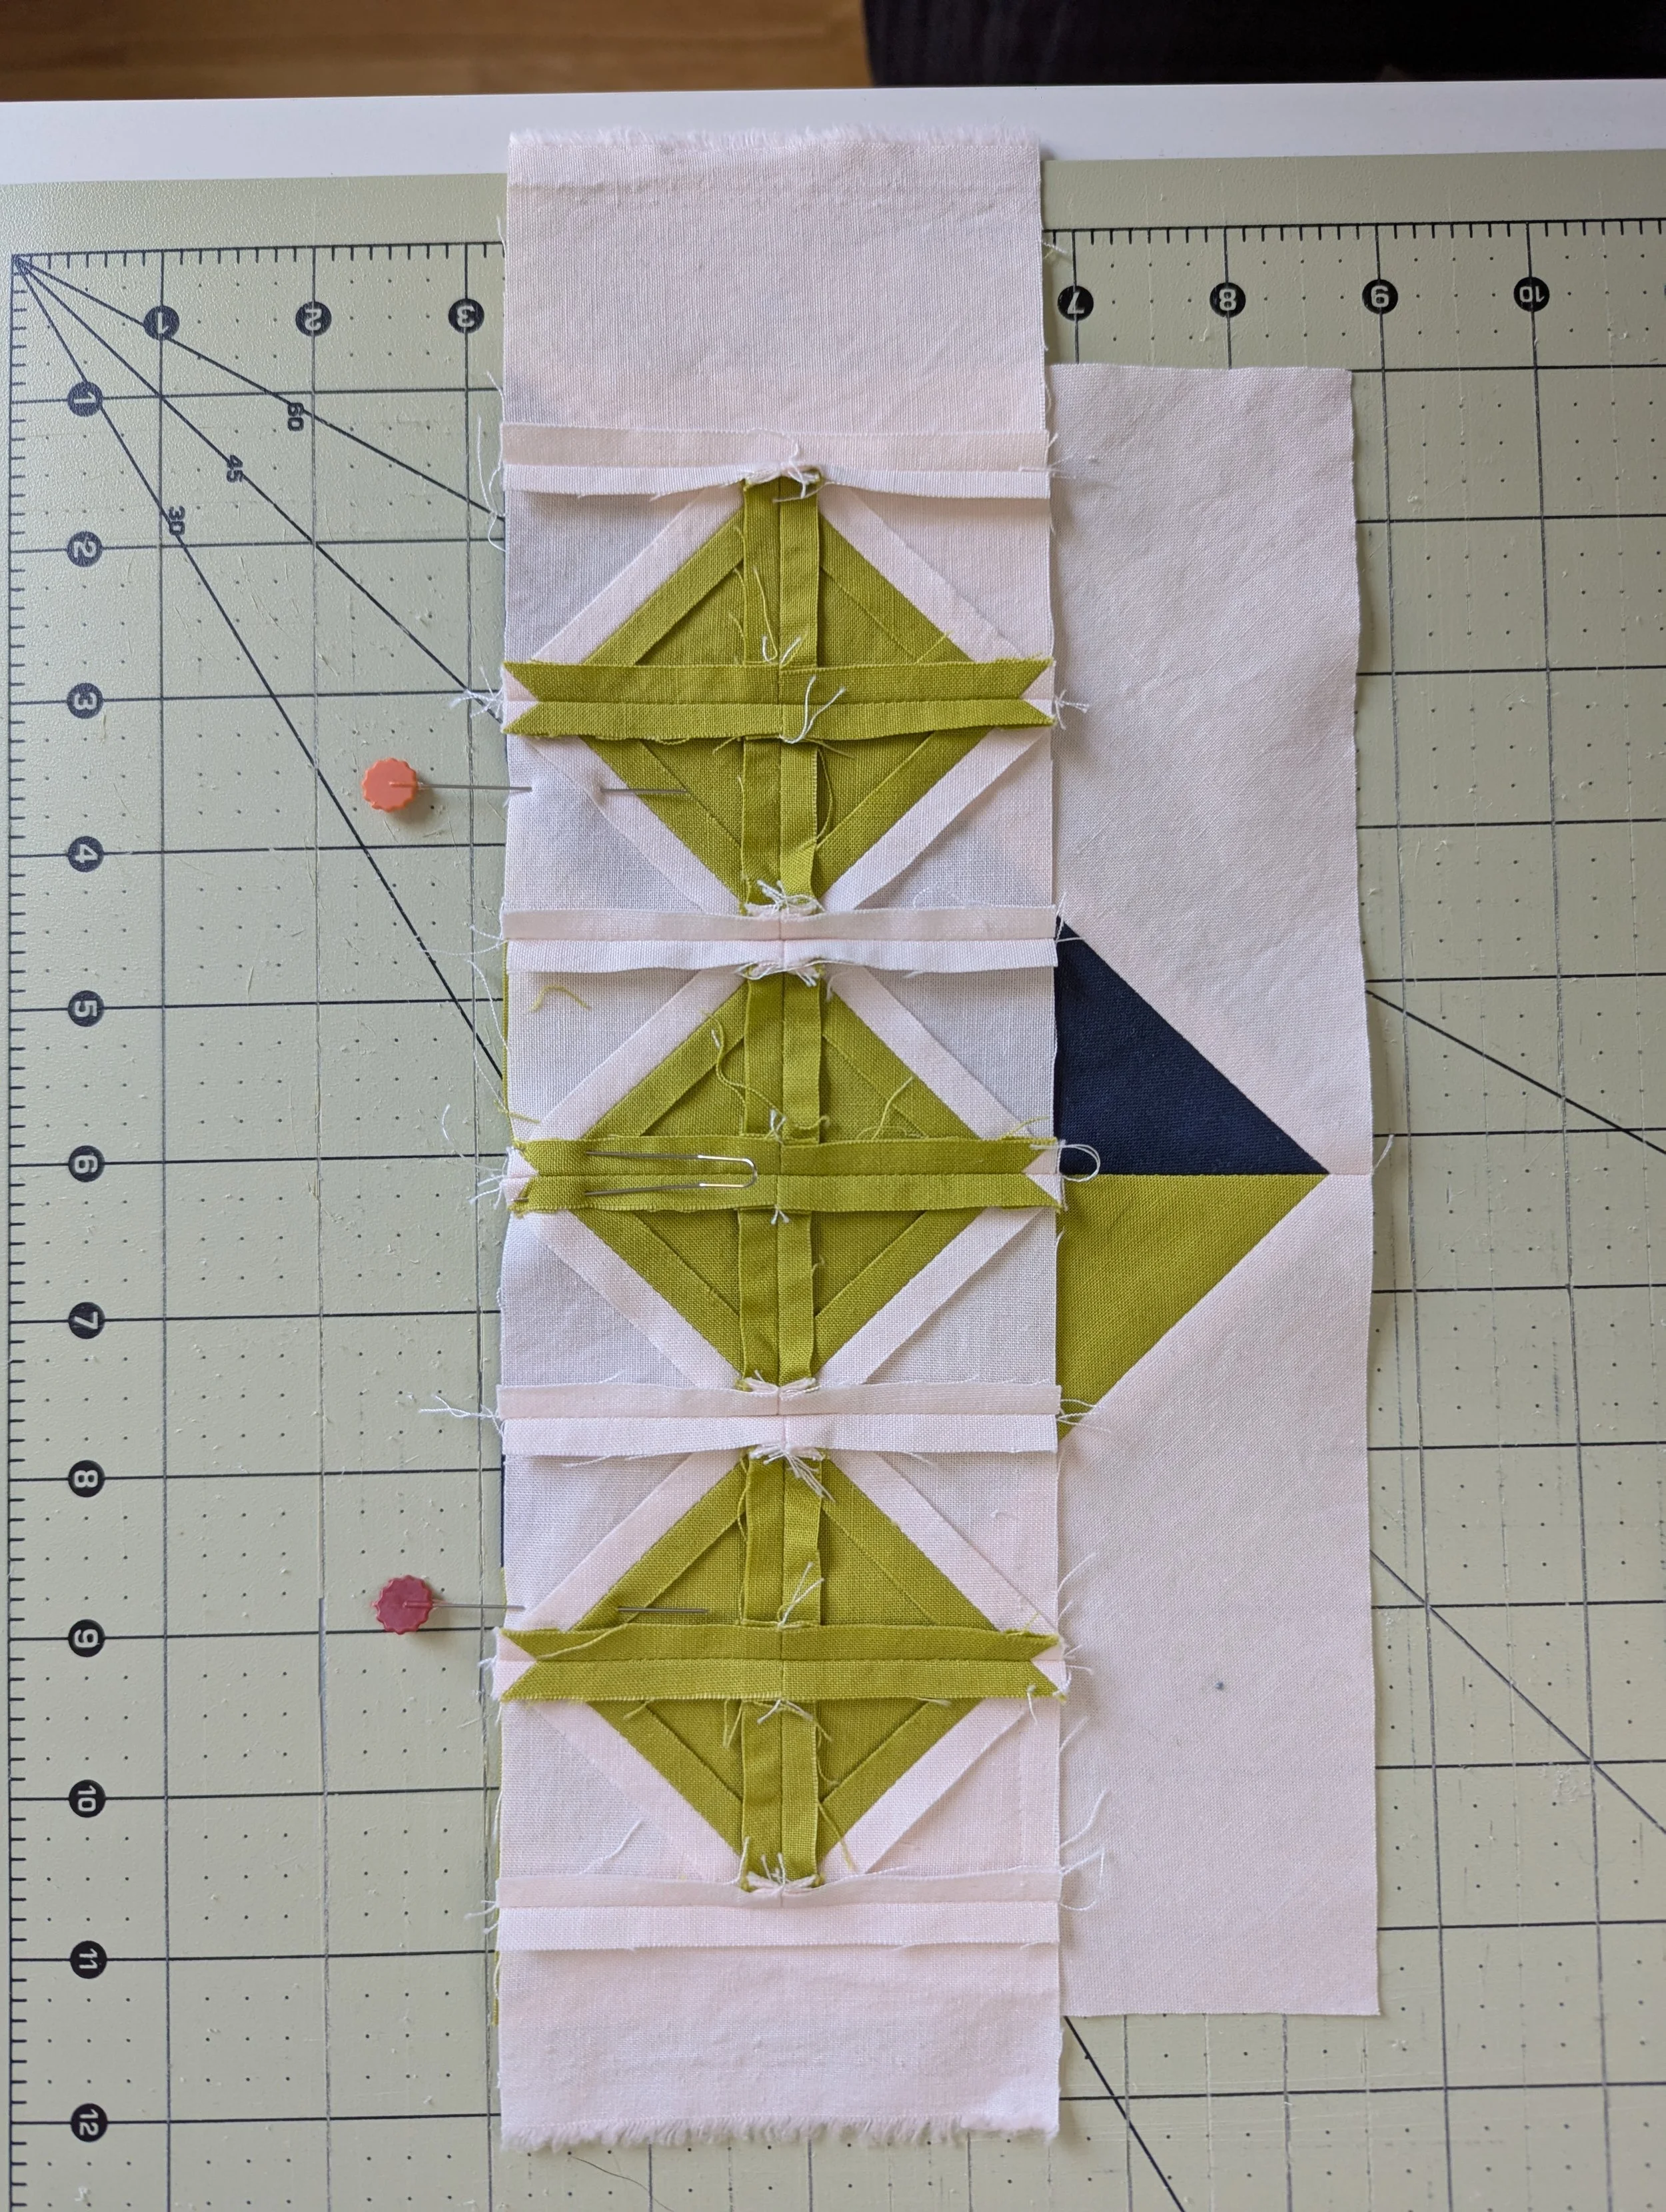
Sewing together the diamond stripe to one of the Block A/B pieces.
Trim the extra pieces of the middle strip to align with the edges of the Block A/B sets.

All trimmed and ready for a border.
Attach the 3.5” x 13.5” pieces to the top and bottom of the block.
Attach the 2” x 16.5” pieces to the sides.
Hooray! The quilt top is complete!

Completed top for The 279 Quilt Pillow
Quilt And Assemble
Make a quilt sandwich using your cushion top, the batting, and the 20½" square piece of fabric. Quilt as desired, then square your quilt and trim any excess batting and backing.
*Tip! Small projects are great ways to experiment with new quilting techniques! I ended up using the radiating concentric quilting design from Walk 2.0 by Jacquie Gering.
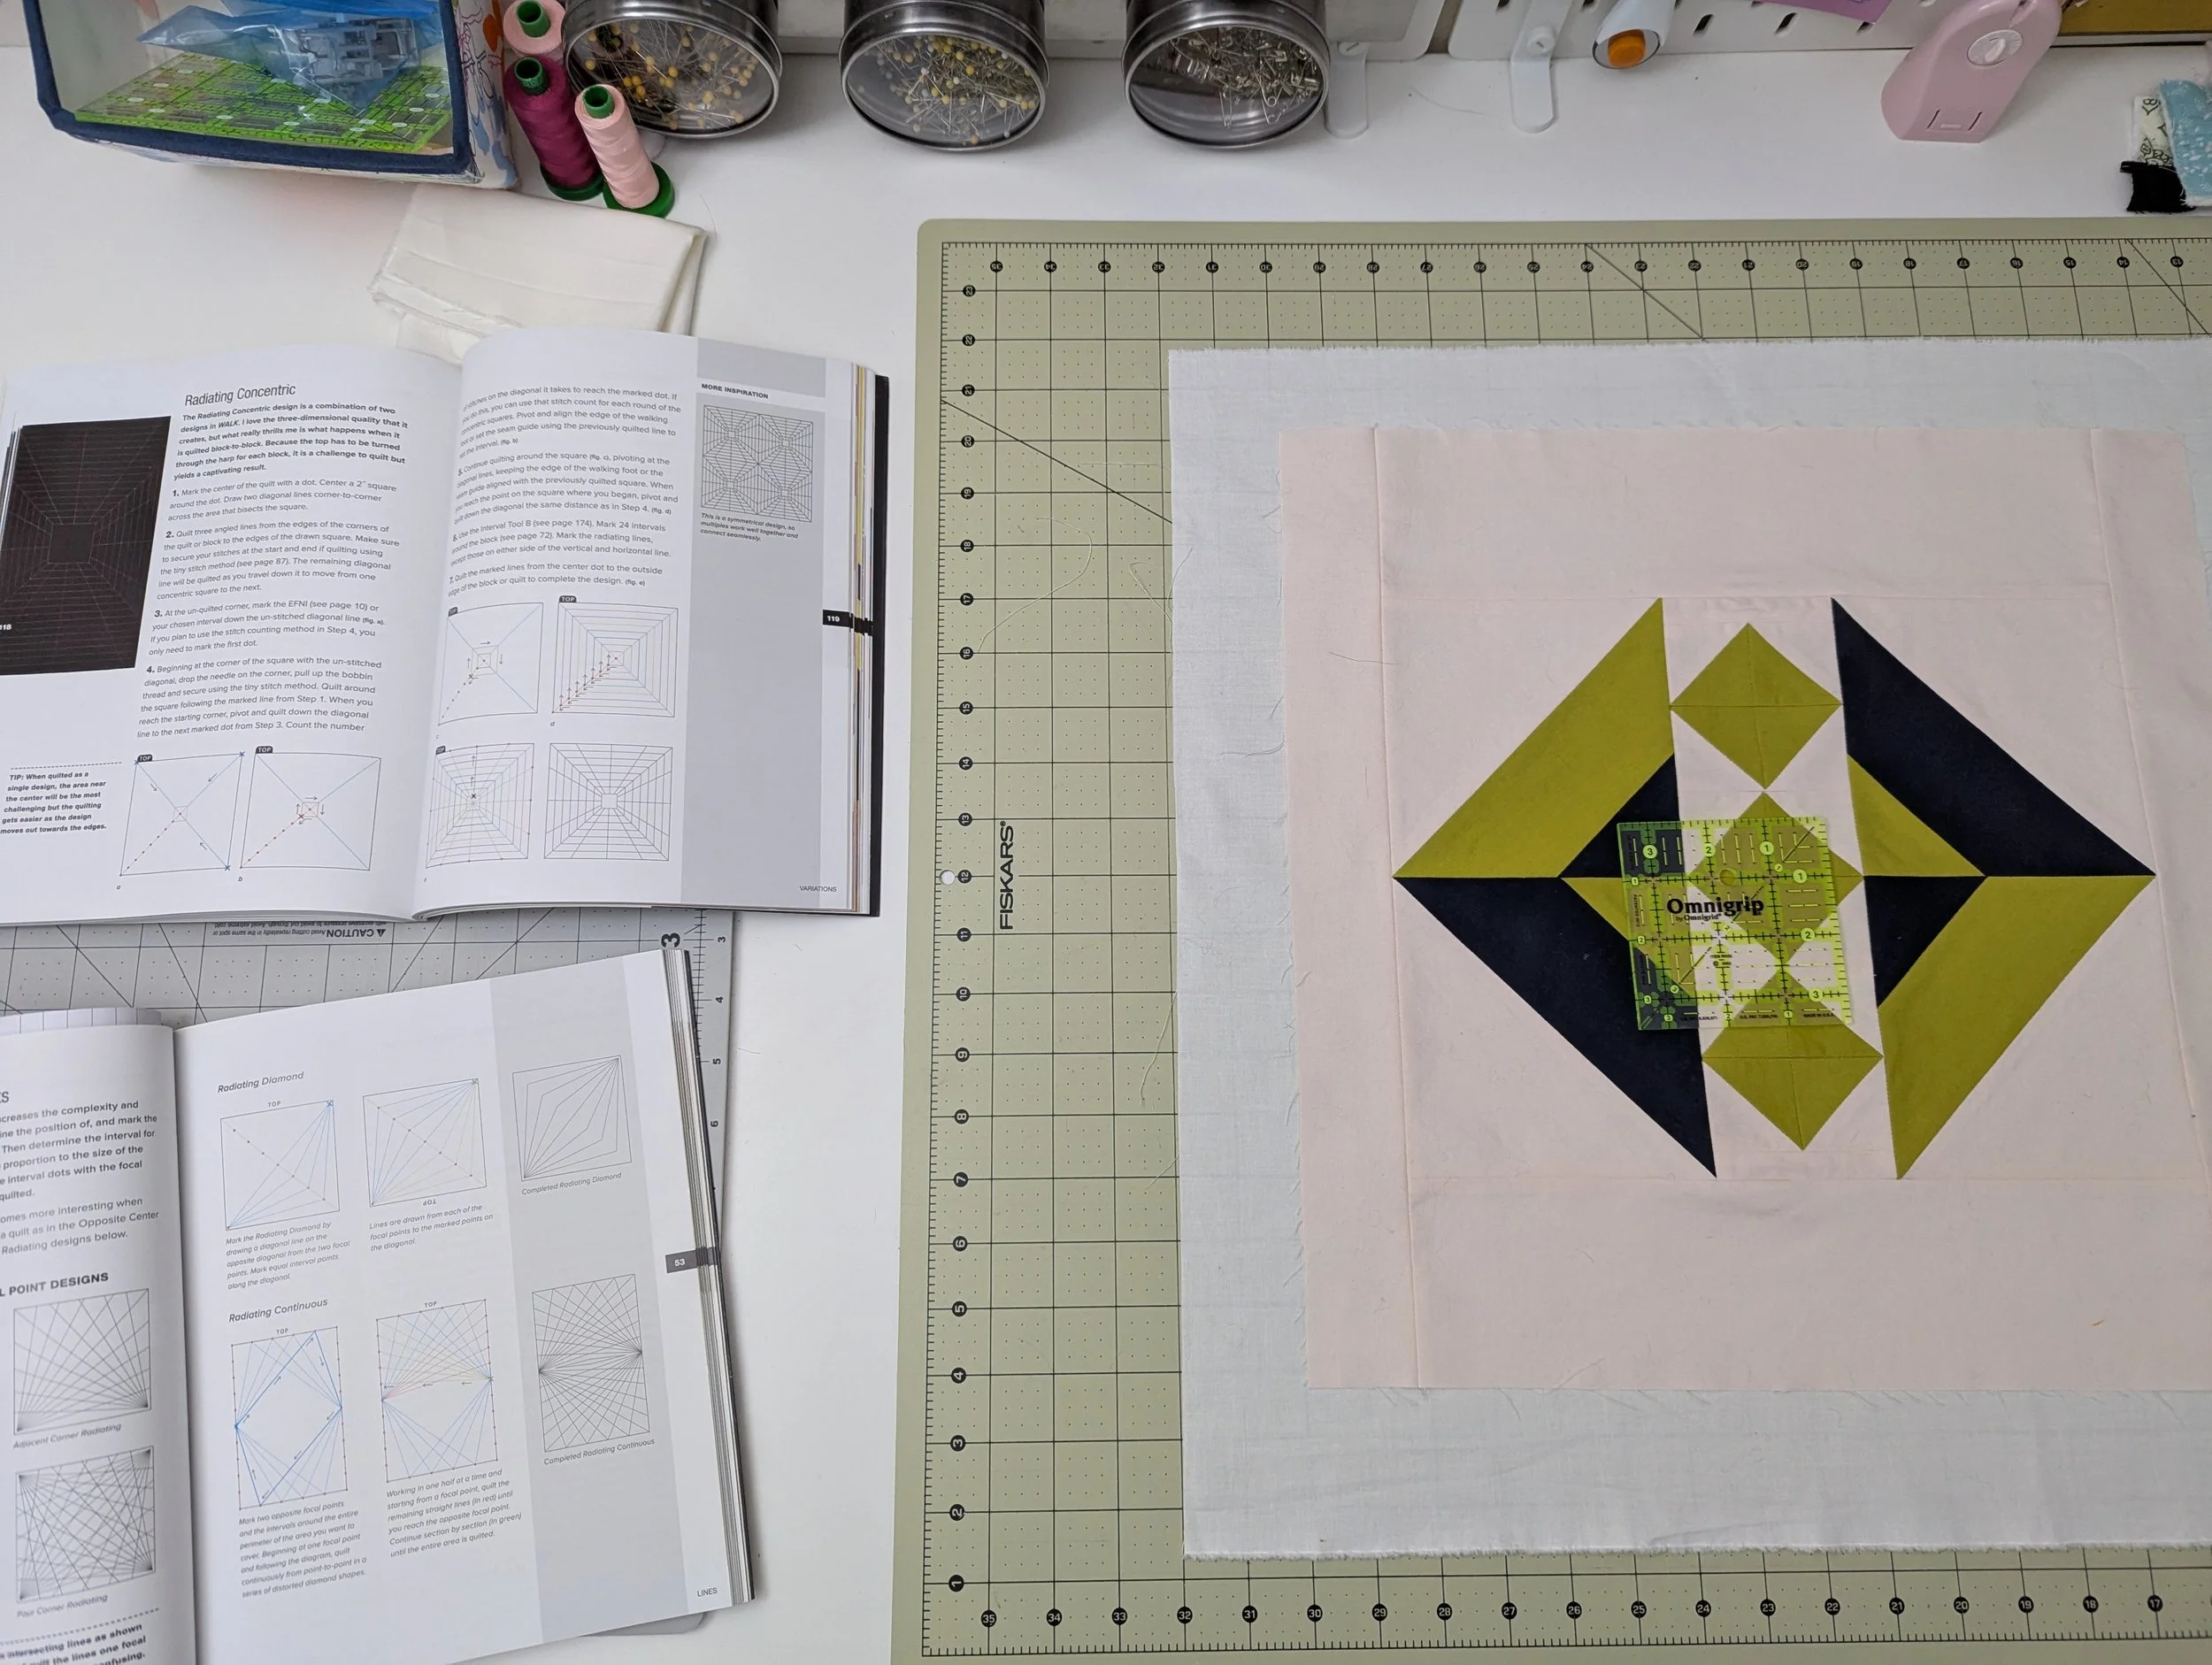
Figuring out a quilting plan

Making some additional markings for my quilting
For the cushion backing- fold (1) 16½" edge under ½", WST. Press, then edge stitch your seam. Repeat on (1) 16½" side of the other panel.
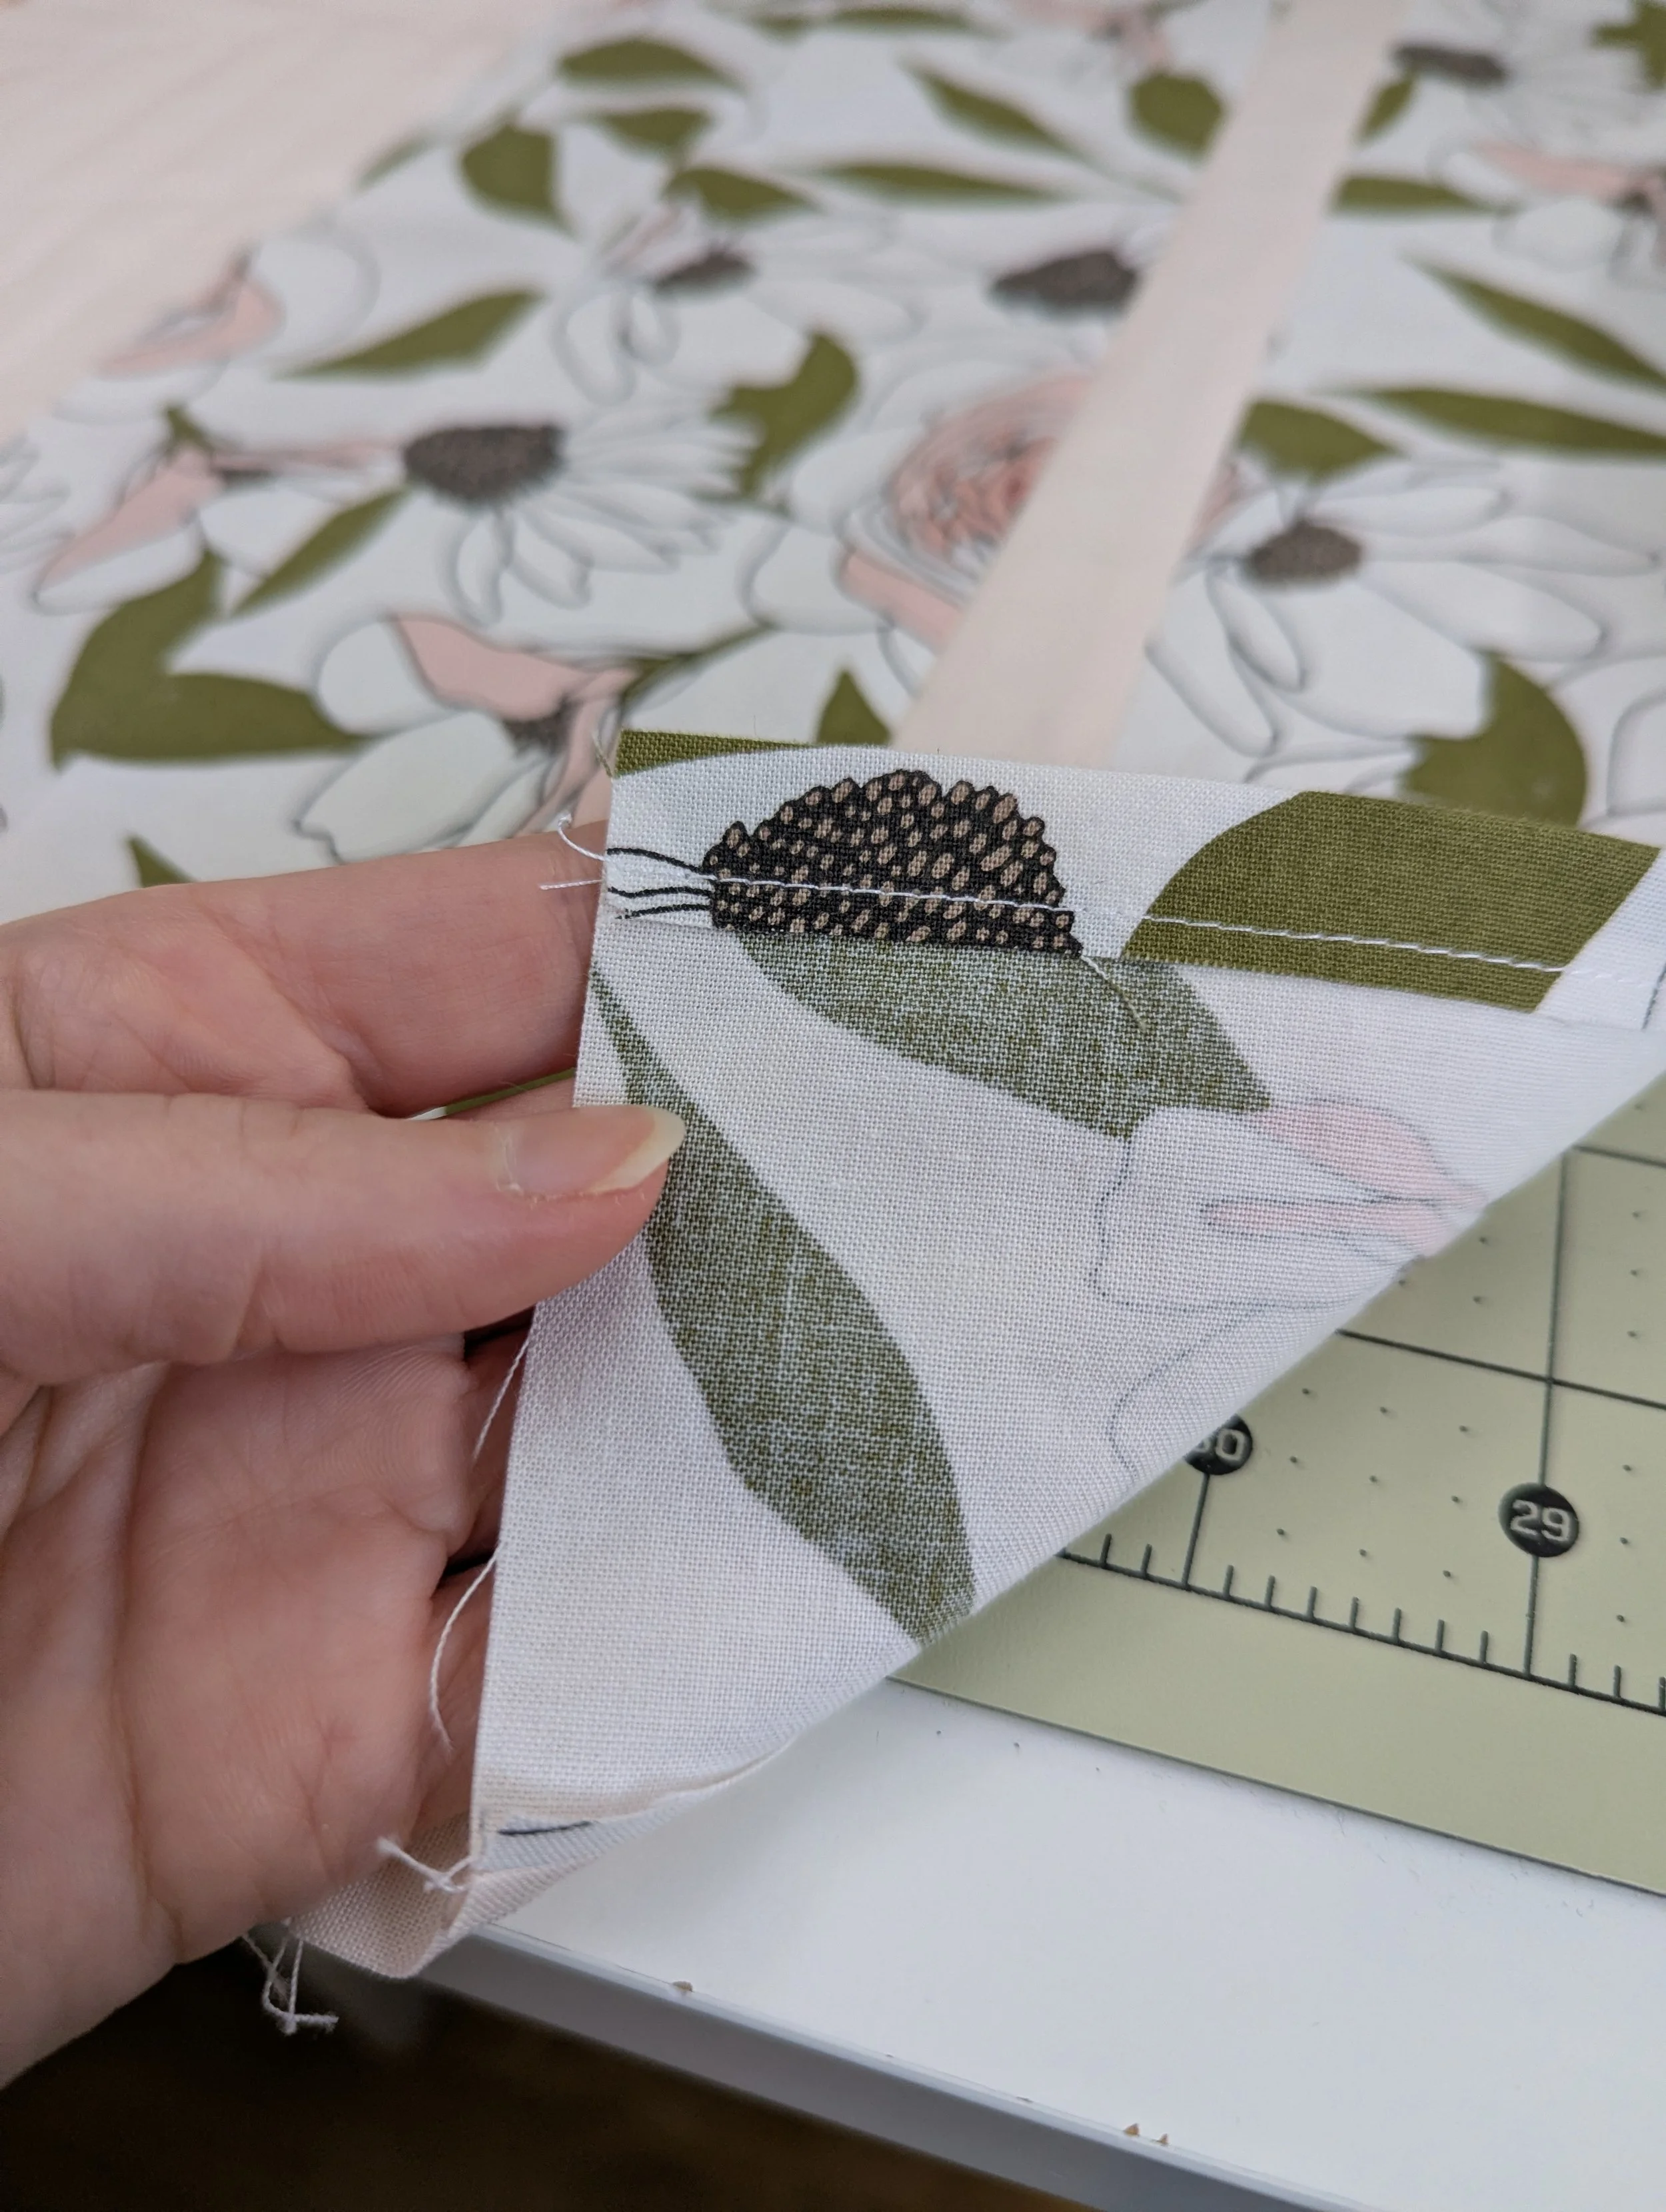
Edge stitched seam of one backing panel

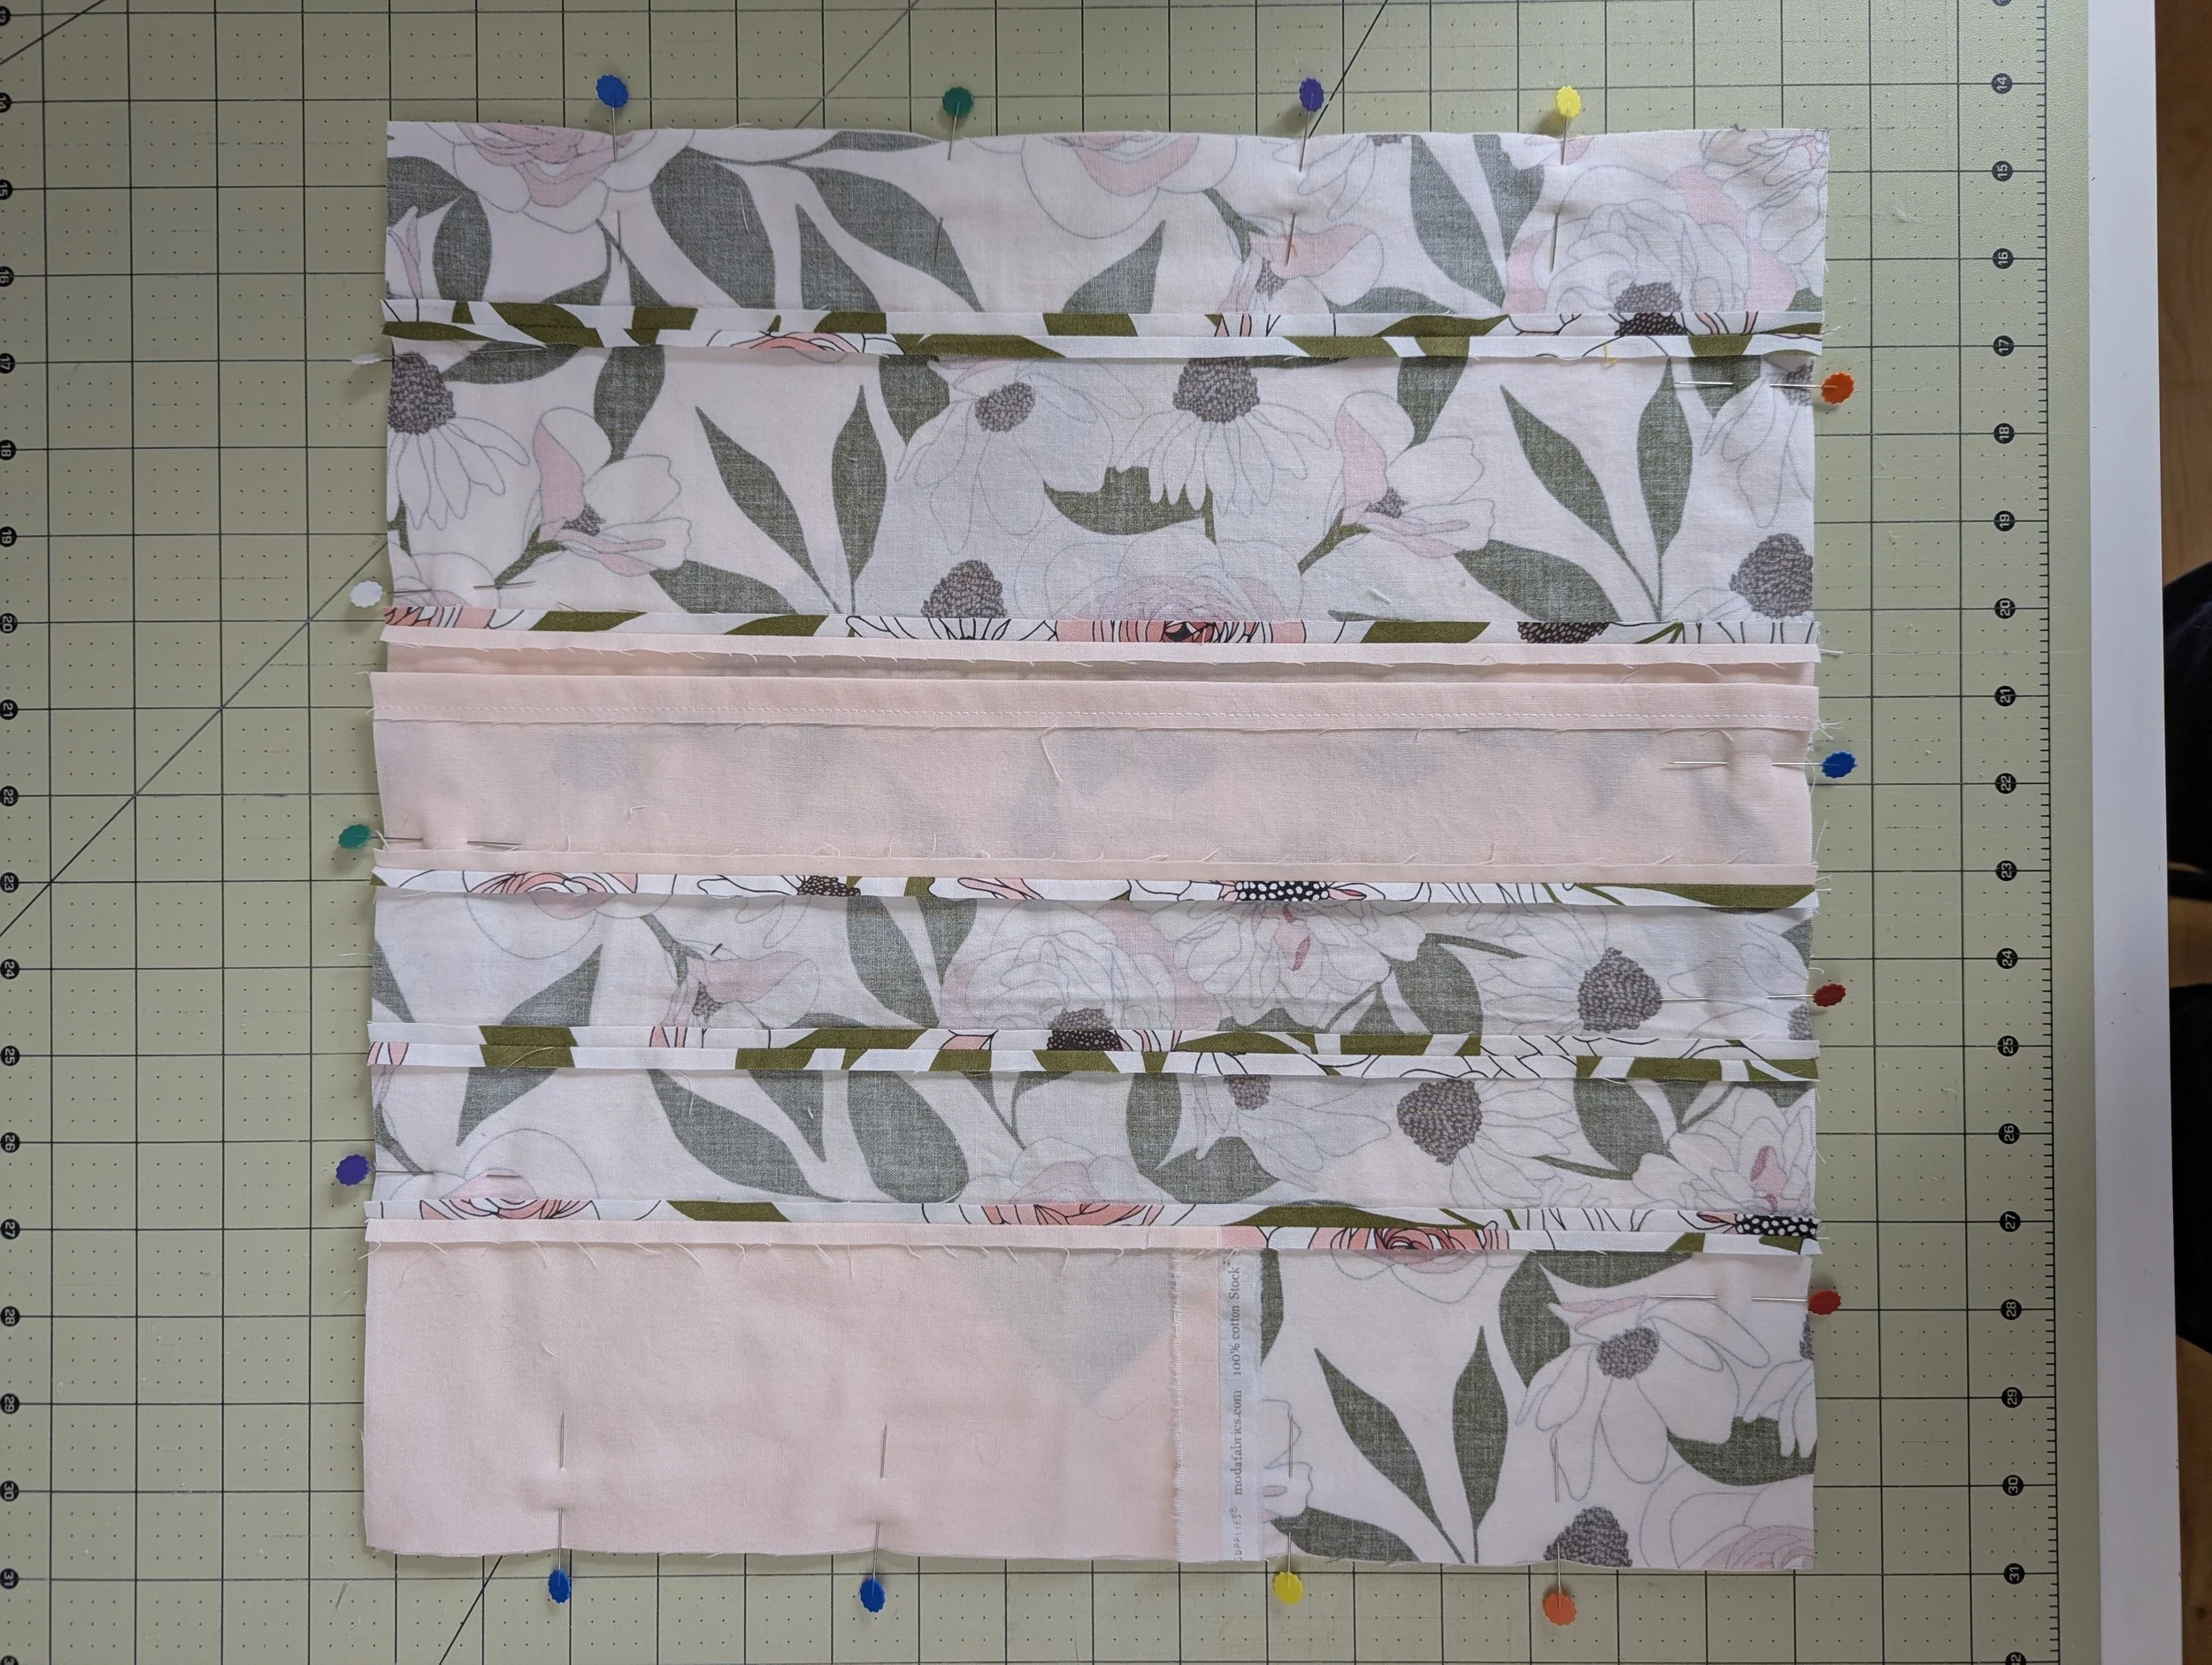
Here are my two backing panels. I ended up piecing some scraps leftover from my backing fabric when I made the Baby sized 279 Quilt.
Lay your cushion top face up. RST, align your back pieces with the cushion top. The back pieces (with the edge stiched seams) will overlap in the middle. (If there’s a certain way you want your back ‘seam’ to lay in relation to your pillow top, now is the time to decide this!)

Put your quilt top facing up, and lay your panels on top, RST.
Pin in place and sew all the way around using a ½" seam allowance (I use my walking foot for this step!).
Pin the entire way around the pillow. Because this is an envelope style pillow case, you don’t need to leave any gaps to turn the pillow inside out!
Clip the corners, flip inside out, and insert your 16" square pillow insert.

Clip the corners, making sure to not cut into the seam.
That’s it! Your pillow top is complete!

Completed 279 Quilt Pillow

The back of The 279 Quilt Pillow
This little cushion has some Star Wars vibes to it, and the quilting definitely adds to that vibe!
I really enjoyed putting this together and seeing what I could make with what I had leftover from my Baby sized quilt. I can’t wait to see yours! Be sure to tag me over on Instagram so I can see your gorgeous creations!
Until then, here’s Millie enjoying my new pillow <3

Millie being an excellent pillow model.
Happy quilting!